
When I first stumbled upon the idea of Oreo Sushi, I couldn’t help but laugh. The thought of turning my favorite childhood cookie into a playful, bite-sized sushi roll was pure dessert genius. I remember pulling out a batch for a casual weekend get-together, and watching everyone’s eyes light up as they realized we were about to eat chocolatey, creamy “sushi.” It’s the kind of recipe that doesn’t just satisfy your sweet tooth—it sparks conversation, laughter, and a little bit of nostalgia. If you’re someone who loves simple, no-bake desserts that make a big impression, this is your moment. For a little inspiration on other fun, crowd-pleasing sweets, check out these easy chocolate treats that pair perfectly with a casual movie night.
What’s amazing about Oreo Sushi is how ridiculously simple it is, yet it looks like something you’d find in a fancy dessert shop. Just a handful of ingredients, a little rolling action, and a few careful slices, and suddenly you’ve got a tray of adorable, bite-sized delights. Even kids can get involved, making this a perfect rainy-day activity or party treat. I promise, by the time you take your first bite of that creamy, chocolatey goodness, you’ll be hooked—and maybe even inspired to get a little creative with flavors and presentation. Trust me, your Pinterest board will thank you once these little rolls make an appearance.
Ingredients
Here’s everything you’ll need to make these adorable Oreo Sushi rolls. I’ve included little tips to make sure your dessert turns out perfectly every time.
- 18 Oreo Cookies – Any variety works, but classic Oreos give the perfect balance of chocolate and cream. For a twist, try mint or birthday cake Oreos.
- 2 tablespoons Milk – Helps bind the cookie crumbs into a pliable dough. Use whole milk for creamier texture, or a non-dairy milk if needed.
- Optional toppings or add-ins:
- White Chocolate or Chocolate Drizzle – Adds a pretty finishing touch and extra sweetness.
- Sprinkles – Perfect for a festive look, especially if you’re making these for kids’ parties.
- Fruit slices (like strawberries or bananas) – Add freshness and a fun contrast to the rich chocolate.
Tip: If you want your rolls extra sturdy, chill the dough for 10–15 minutes before spreading the cream. It makes rolling so much easier and keeps your “sushi” looking neat.

Instructions
Making Oreo Sushi is easier than it looks, and it’s surprisingly fun! Follow these steps, and you’ll have a tray of bite-sized chocolatey rolls in no time.
Step 1: Prep the Oreos
Start by separating the Oreo cookies. Carefully twist each cookie apart so you have the cream on one side and the chocolate cookies on the other. Place the chocolate halves in a food processor and pulse until they turn into fine crumbs. The texture should feel slightly sandy but easy to press together. Don’t worry if there are a few larger chunks—they add a bit of rustic charm.
Step 2: Make the Oreo Dough
Transfer the cookie crumbs into a bowl and add 2 tablespoons of milk. Use a spoon or your hands to knead the mixture gently until it forms a soft, pliable dough. It should hold together without being sticky. This is the magical base that will help your sushi rolls stay intact while still creamy inside.
Step 3: Roll Out the Dough
Place the dough between two sheets of parchment paper and gently roll it out into a rectangle about 1/4 inch thick. The dough should be smooth and even—think of it like a little chocolate mat for your sushi. If it starts sticking, just dust a bit of cocoa powder or press it gently with parchment paper.
Step 4: Spread the Cream
Take the reserved Oreo cream filling and spread it evenly over the rolled-out dough using a spatula. Don’t worry about perfection here—a thin, even layer is perfect. This creamy layer is what gives your sushi that signature “bite of indulgence” in every slice.
Step 5: Roll and Chill
Carefully roll the dough into a tight log, starting from one end. Use the parchment paper to help guide it and keep the shape neat. Once rolled, wrap it in the parchment and refrigerate for at least 15–20 minutes to firm up. Chilling makes slicing easier and keeps each roll intact.
Step 6: Slice Like Sushi
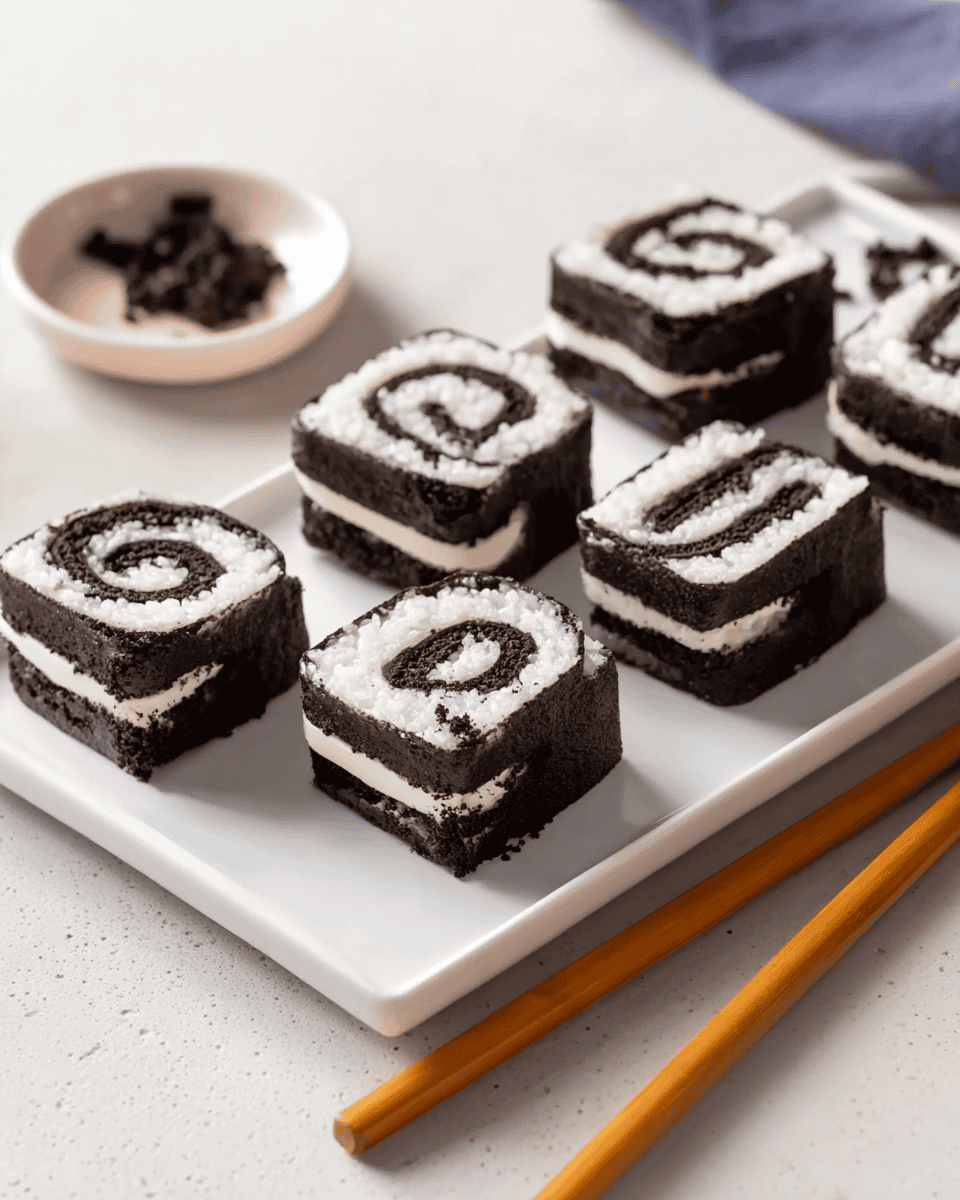
Remove the log from the fridge and, using a sharp knife, slice it into 1/2–3/4 inch pieces. Each piece should reveal the creamy center surrounded by the chocolatey “sea.” If you want, drizzle with melted white or dark chocolate, or sprinkle with a few festive sprinkles for an extra pop.
Step 7: Serve and Enjoy
Arrange your Oreo Sushi on a cute plate or platter, just like a sushi presentation at a restaurant. The contrast between the dark cookie and the creamy filling is irresistible, and it’s fun to see everyone’s reaction as they grab a piece. Don’t be surprised if these disappear within minutes!
Tips & Variations
Oreo Sushi is a playful and flexible dessert, and these tips will help you make it even more fun and foolproof.
Flavor Swaps
- Try different Oreo flavors: Mint, peanut butter, birthday cake, or golden Oreos all work beautifully. Each adds a unique twist to the dessert.
- Add a drizzle: Melted chocolate, caramel, or even a touch of peanut butter makes the rolls extra decadent.
- Incorporate fruit: Thin slices of strawberries, bananas, or kiwi can be layered with the cream for a refreshing flavor contrast.
Assembly Tips
- Chill the dough: If the dough feels sticky, refrigerate it for 10–15 minutes before spreading the cream. It makes rolling much easier.
- Use parchment paper: Rolling between parchment prevents sticking and keeps the log smooth.
- Sharp knife slicing: Dip your knife in hot water and wipe it clean before slicing each piece to get perfectly neat sushi rolls.
Storage Advice
- Refrigeration: Store the Oreo Sushi in an airtight container in the fridge for up to 3 days.
- Freezing: You can freeze the rolls (before slicing) for up to a month. Thaw in the fridge before slicing and serving.
- Avoid moisture: Keep the sushi away from humid areas to maintain its crisp chocolate exterior.
Fun Variations
- Mini sushi tray: Make tiny bite-sized pieces for parties or lunchboxes.
- Decorate creatively: Use sprinkles, edible glitter, or drizzle patterns to make it extra “Pinterest-ready.”
- Themed versions: Customize for holidays—red and green Oreos for Christmas, pastel sprinkles for Easter, or heart-shaped presentation for Valentine’s Day.
Serving Suggestions
Presentation is everything when it comes to Oreo Sushi, and a little creativity goes a long way. Here’s how to serve these fun, bite-sized desserts so they look as good as they taste.
Plating Ideas
- Arrange like sushi: Line the rolls neatly on a rectangular platter or sushi tray. Alternate slices of different Oreo flavors for a colorful display.
- Mini plates or dessert towers: Use small plates or tiered trays for parties. It’s perfect for a dessert buffet or tea party setup.
- Add garnishes: Sprinkle a few mini chocolate chips, edible glitter, or crushed cookies around the plate for extra visual appeal.
Flavor Pairings
- Milk or milkshakes: A cold glass of milk complements the rich chocolate perfectly. Try a flavored milkshake, like vanilla or strawberry, for a fun twist.
- Fresh fruit: Serve alongside strawberries, raspberries, or banana slices. The fruit adds freshness and a pop of color.
- Ice cream: Mini scoops of vanilla or chocolate ice cream pair wonderfully for an indulgent dessert plate.
Fun for Kids & Parties
- Let kids assemble their own rolls at a party station. They can pick their favorite Oreo flavors, add toppings, and roll their own sushi.
- Serve as a conversation starter or game-themed dessert for events. Oreo Sushi is not just a treat—it’s a playful activity that guests will love.
Tip: For Pinterest-ready photos, use bright plates, sprinkle some extra Oreos around the tray, and keep the sushi pieces slightly spaced so each slice stands out. Natural light makes these chocolate rolls pop beautifully in images.

FAQs
1. Can I make Oreo Sushi ahead of time?
Absolutely! You can assemble the sushi rolls and store them in the fridge for up to 3 days. For the neatest slices, chill the log first and slice just before serving. This ensures the rolls hold their shape perfectly.
2. Can kids help make this dessert?
Yes! Oreo Sushi is kid-friendly and a fun activity for little hands. They can help spread the cream, roll the dough, and even decorate with toppings. Just supervise with a sharp knife when it’s time to slice.
3. Can I use gluten-free or alternative Oreos?
Definitely. Gluten-free Oreos, vegan Oreos, or other sandwich cookies work well. Just be aware that texture and sweetness may vary slightly depending on the brand.
4. How do I prevent the rolls from falling apart?
Chilling the dough before rolling and slicing is key. Also, make sure your Oreo dough isn’t too dry—adding the milk gradually helps keep it pliable. Use a sharp, warmed knife for clean slices.
5. Can I freeze Oreo Sushi?
Yes! Freeze the log before slicing for up to a month. When ready to serve, thaw in the fridge for 15–20 minutes before slicing to maintain shape and texture.
6. Can I add other fillings besides the Oreo cream?
Absolutely. You can try peanut butter, Nutella, or a cream cheese frosting as a creative twist. Just keep in mind that very runny fillings may affect rolling, so slightly thicker spreads work best.
Final Thoughts
Oreo Sushi is more than just a dessert—it’s a playful, no-bake treat that brings a smile to everyone who tries it. Whether you’re making it for a party, a cozy weekend snack, or a fun activity with kids, these bite-sized chocolate rolls are sure to impress. The best part? They’re simple to make, require minimal ingredients, and offer endless opportunities for creativity with flavors, toppings, and presentation.
If you’re inspired to experiment further in the kitchen, try pairing these little sushi rolls with other no-bake treats like chocolate truffles or fruity dessert bites for a fun dessert platter. Remember, the most important part is to have fun while making it—your joy in creating this whimsical dessert is what makes it truly unforgettable. So grab some Oreos, get rolling, and treat yourself to a sweet, creative adventure that’s perfect for sharing (or sneaking a few bites on your own!).
Print
Oreo Sushi Recipe: The Fun, No-Bake Dessert You’ll Want to Make Today
- Total Time: 15 minutes
- Yield: 18–20 sushi rolls 1x
Description
Oreo Sushi is a playful, no-bake dessert that turns classic cookies into bite-sized sushi rolls. Perfect for kids, parties, or a fun weekend treat, this simple recipe is easy to make, visually delightful, and endlessly customizable.
Ingredients
18 Oreo Cookies (any flavor)
2 tablespoons Milk (or non-dairy alternative)
Optional toppings:
White chocolate or chocolate drizzle
Sprinkles
Fruit slices like strawberries or bananas
Instructions
Prep the Oreos: Separate the cookies and place chocolate halves in a food processor. Pulse into fine crumbs.
Make the dough: Combine crumbs with milk and knead until soft and pliable.
Roll the dough: Place between parchment paper and roll into a rectangle, about 1/4 inch thick.
Spread the cream: Spread the reserved Oreo cream evenly over the rolled-out dough.
Roll and chill: Roll dough into a log, wrap in parchment, and refrigerate for 15–20 minutes.
Slice: Using a sharp knife, slice into 1/2–3/4 inch pieces. Optional: drizzle with chocolate or add sprinkles.
Serve: Arrange on a platter or mini plates and enjoy!
Notes
Chill the dough to make rolling easier.
Use a warm, sharp knife for clean slices.
Store in an airtight container in the fridge for up to 3 days.
Freeze the log (before slicing) for up to a month.
Fun for kids to assemble and decorate.
- Prep Time: 15 minutes
- Cook Time: 0 minutes
- Category: Dessert
- Method: No-Bake
- Cuisine: American
Nutrition
- Serving Size: 1 roll
- Calories: 95 kcal
- Sugar: 10 g
- Sodium: 45 mg
- Fat: 5 g
- Saturated Fat: 3 g
- Unsaturated Fat: 2 g
- Trans Fat: 0g
- Carbohydrates: 12 g
- Fiber: 1g
- Protein: 1g
- Cholesterol: 5 mg